The Wavlink Aerial HD2 Setup is a versatile wireless access point that caters to your internet connectivity needs. Whether you opt for a wired or wire-free setup, following these step-by-step instructions will enable you to enjoy seamless, high-speed Wi-Fi coverage in your desired location.

With the Aerial HD2, you can extend your network range effortlessly and stay connected wherever you go.

Steps to Follow for Wavlink Aerial HD2 with Wire

  • Choose a suitable location for the Wavlink Aerial HD2 Setup that is close to your main router or modem. Ensure the site is free from physical obstructions and has a clear line of sight to provide optimal Wi-Fi coverage.
  • Now, plug one end of the Ethernet cable into the LAN port of the Aerial HD2 and the other end into an available LAN port on your router or modem.
  • Connect the power adapter to the Aerial HD2 and plug it into a power outlet. The device should power on, and the LED indicators will start blinking.
  • Access the configuration page of the Aerial HD2 by typing its default IP address (usually 192.168.10.1) into your web browser. Follow the on-screen instructions to set up your device and connect it to your existing network using the SSID and password.
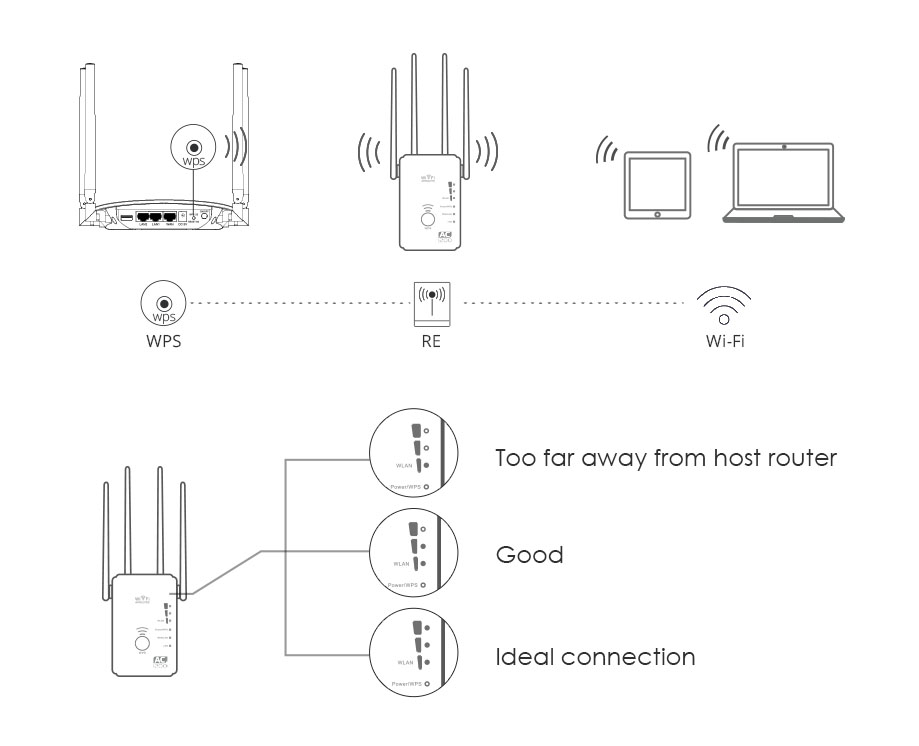
  • Once the configuration is complete, test the Wi-Fi signal to ensure it's working correctly. You can use a Wi-Fi analyzer app or visit various locations in your coverage area to check the signal strength.

Now, How to Set Wavlink Aerial HD2 Setup Without Wire?

Follow these steps set this without wire:-

  • Just like in the wired setup, select an appropriate location with an unobstructed line of sight for the Wavlink Aerial HD2 Setup.
  • Plug the power adapter into the Aerial HD2 and connect it to a power outlet. The device will start up, and the LED indicators will blink.
  • On your computer or mobile device, locate and connect to the Aerial HD2's default Wi-Fi network (usually named "wavlink-xxxx," with "xxxx" being a unique identifier).
  • Open your web browser and enter the default IP address (typically 192.168.10.1) to access the setup wizard. Follow the on-screen instructions to configure your Aerial HD2.
  • During the setup process, you'll be prompted to connect the Aerial HD2 to your existing Wi-Fi network by providing the SSID and password.
  • After the configuration is complete, test the Wi-Fi signal to ensure it's functioning correctly. Use a Wi-Fi analyzer app or check the signal strength in different areas of your coverage zone.
wavlink extender setup


How Do I Connect the Wavlink Wi-Fi?

Step 1: Locate the Wavlink Wi-Fi in Centre

  • Place the router in a central location, preferably elevated and free from obstructions, to ensure optimal signal coverage.
  • Locate the power adapter and Ethernet cable provided in the package.

Step 2: Powering On the Router

  • Connect one end of the power adapter to the router's power input port.
  • Plug the other end of the power adapter into a power outlet.
  • Turn on the router using the power button or switch, if applicable.
  • Wait for the router's LED lights to stabilize, indicating that it's powered on and ready for configuration.

Step 3: Connecting to the Router

  • On your computer or mobile device, access the list of available Wi-Fi networks.
  • Locate and select the Wi-Fi network name (SSID) associated with your Wavlink router. This information can usually be found on a sticker on the router itself.
  • If prompted, enter the Wi-Fi network password. This can also be found on the router's sticker or in the documentation provided.

Step 4: Accessing the Router's Configuration Page

  • Open a web browser (e.g., Chrome, Firefox, Safari) on your connected device.
  • In the address bar, type the default IP address of the router. Common addresses include "192.168.10.1" or "wifi.wavlink.com". Press Enter.
  • You will be prompted to enter the router's username and password. Refer to the user manual or the router's label for the default credentials. It's recommended to change these credentials later for security purposes.

Step 5: Configuring the Wi-Fi Settings

  • Once logged into the router's configuration page, navigate to the Wireless or Wi-Fi settings section.
  • Here, you can customize your Wi-Fi network name (SSID) to something recognizable and unique.
  • Set a strong Wi-Fi password to secure your network. Ensure it's a mix of letters, numbers, and special characters.
  • Select the desired security protocol (WPA2 is recommended) for your Wi-Fi network.

Step 6: Save and Apply Changes

  • After making the necessary configurations, save your settings.
  • Your router may prompt you to apply changes or restart. Confirm the action to apply the new settings.

Step 7: Reconnect to Wi-Fi

  • Once the router restarts and the changes are applied, your Wi-Fi network will temporarily disconnect.
  • Reconnect to your Wi-Fi network using the updated SSID and password you configured.