wifi wavlink login setup - wifi.wavlink.com

What is the Purpose of Using Wi-Fi Extenders?

The purpose of using Wi-Fi extenders is to enhance and extend the coverage of your wireless network, particularly in areas where the Wi-Fi signal is weak or limited. Wi-Fi extenders, also known as Wi-Fi repeaters or range extenders, work by receiving the existing Wi-Fi signal from your router, amplifying it, and rebroadcasting it to reach areas that are farther away or experiencing poor signal strength.

What are the Benefits of Using Wi-Fi Extenders for Home or Office?

The prominent advantage of using them is the enhanced coverage for your work. Here are some advantages mentioned of using Wi-Fi Extenders:-

Expanded Coverage

Wi-Fi extenders help eliminate dead zones or areas with weak signal strength in your home or office by extending the reach of your wireless network. Wifi.wavlink.com allows you to access the internet from various locations that were previously out of range.

Improved Signal Strength

By amplifying the Wi-Fi signal, extenders can improve the overall signal strength in areas that were receiving a weak or intermittent connection. This leads to better data transfer speeds and a more stable network connection.

Cost-Effective Solution

Wi-Fi extenders are generally more affordable compared to purchasing additional routers or running Ethernet cables to extend the network. They provide a cost-effective means to enhance Wi-Fi coverage without major infrastructure changes.

Easy Setup

Wi-Fi extenders are designed to be user-friendly and typically require minimal setup. Most models can be easily installed by plugging them into a power outlet and connecting them to your existing wireless network.

Seamless Roaming

Some Wi-Fi extenders offer seamless roaming capabilities, allowing your devices to automatically switch between the extender and the main router's network as you move around your home or office. This ensures a smooth and uninterrupted connection without manual network switching.

What is Wavlink Wi-Fi Extender Setup?

Wavlink Wi-Fi Extender is the good solution to say, “Goodbye” to weak signal. It is a brand that manufactures networking devices, including Wi-Fi extenders. A Wavlink extender, also known as a Wavlink Wi-Fi repeater or range extender, is a specific model of Wi-Fi extender produced by Wavlink.

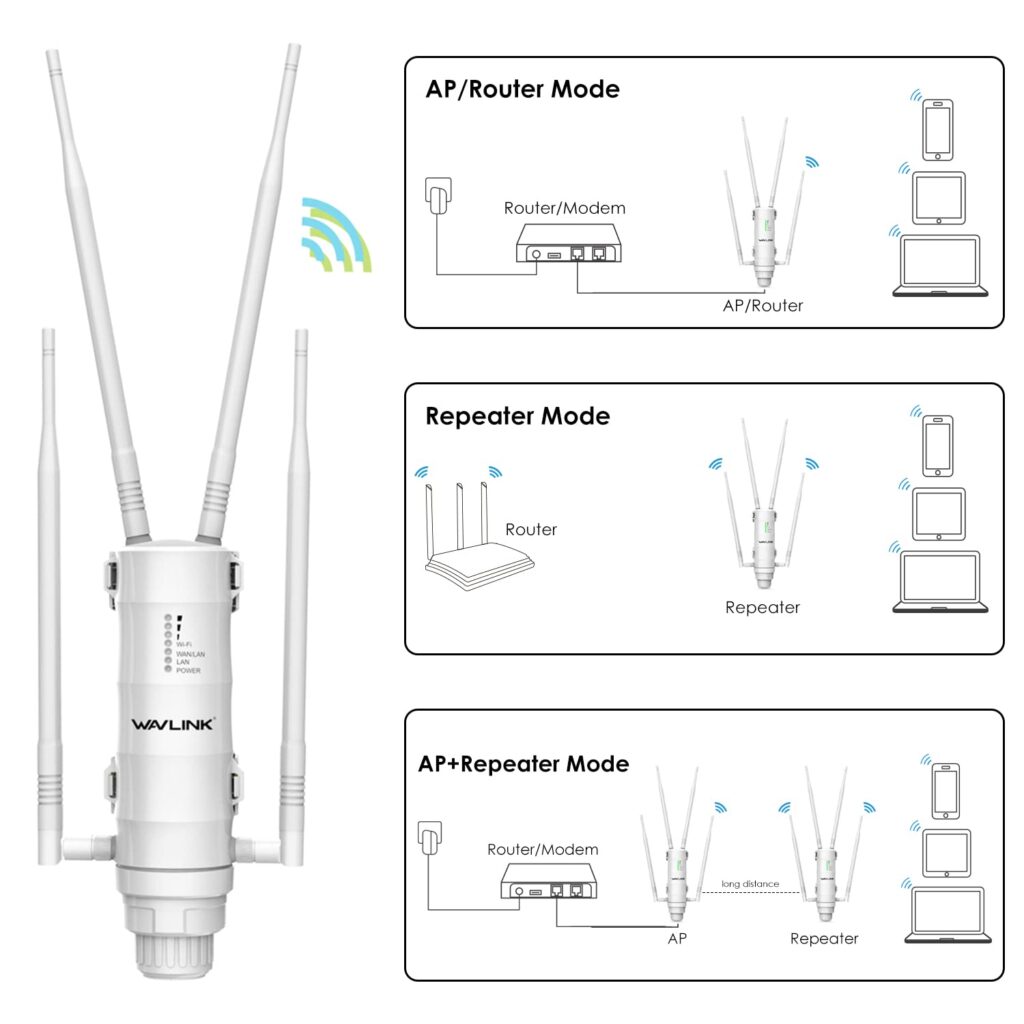
Wavlink extender are designed to enhance the coverage and performance of your wireless network. They operate by receiving the existing Wi-Fi signal from your router, amplifying it, and rebroadcasting it to reach areas with weak or no Wi-Fi coverage. This helps eliminate dead zones and extends the range of your wireless network.

wifi.wavlink.com - How to Setup Wavlink Wi-Fi Extender?

To set up a Wavlink Wi-Fi extender, you can follow these general steps:

Place it in the Optimal Location

Find an optimal location for your Wi-Fi extender. It should be placed within range of your existing Wi-Fi router's signal but close enough to the area where you want to extend the Wi-Fi coverage.

Connect to the Extender

Plug in the Wavlink Wi-Fi extender into a power outlet near your router. Wait for the extender to power on.

Connect to the Extender's Network

On your computer or mobile device, go to the Wi-Fi settings and look for the available networks. You should see a network name (SSID) that starts with "Wavlink" or "WL" followed by a series of characters. Connect to this network.

Go for Configuration Interface

Open a web browser on your connected device and enter the default IP address for the Wavlink extender into the address bar. The default IP address is usually mentioned in the user manual or provided on a sticker on the extender itself. Common default IP addresses include "192.168.0.1" or "192.168.1.1". Press Enter.

Log In to the Extender

You will be prompted to enter a username and password to access the configuration interface. Refer to the user manual or check the sticker on the extender for the default login credentials. Once entered, you should gain access to the configuration settings.


wavlink extender setup

Configure the Extender

Follow the instructions provided in the user manual to configure the extender. You will typically need to select your existing Wi-Fi network from a list, enter the Wi-Fi password, and configure additional settings such as the extended network name (SSID) and password.

Apply Settings and Reboot

Once you have made the desired configuration changes, save the settings and allow the extender to apply the changes. It may take a few moments to reboot and establish a connection with your existing Wi-Fi network.

Connect Devices to the Extender

After the extender has rebooted, reconnect your computer or mobile devices to the newly extended Wi-Fi network. Look for the extended network name (SSID) you configured earlier and enter the corresponding password if required. That’s it. After following the above process, you can easily setup & enjoy the coverage given by your Wi-Fi extender.


Why Wifi.wavlink.com Not Working?

There can be several reasons contributing of non-working of your Wi-Fi extenders that are listed below:-

Server or Website Maintenance

Wifi.wavlink.com may be temporarily down for maintenance or updates. In such cases, you can try accessing the website at a later time.

Internet Connection Issues

It's possible that there may be a problem with your internet connection. Ensure that you have a stable internet connection and try refreshing the webpage or accessing it from a different device.

Incorrect URL or DNS Issue

Double-check that you have entered the correct URL "wifi.wavlink.com" in the address bar of your web browser. If there is a typing error, correct it and try again. Additionally, check if your DNS settings are configured correctly. You can try accessing the website using a different DNS server or clearing your DNS cache.

Blocked Website

It's possible that the website is blocked by your internet service provider (ISP) or by your network administrator. You can contact your ISP or network administrator to inquire about any restrictions on accessing specific websites.

Website Discontinued or Moved

Sometimes, websites may be discontinued or moved to a different domain. Verify if there are any updates or announcements from Wavlink regarding changes to their website URL.


What is the Login Guide for Wavlink Extender?

Here we have designed the quick login guide for Wavlink Extender for you:-

  1. Ensure that your Wavlink extender is connected to a power source and turned on.
  2. Connect your computer or mobile device to the Wi-Fi network transmitted by the Wavlink extender. The network name (SSID) and password can typically be found on a sticker on the extender itself or in the user manual.
  3. Once connected to the extender's Wi-Fi network, open a web browser on your device.\
  4. In the address bar of the web browser, enter the default IP address for the Wavlink extender. The default IP address is usually mentioned in the user manual or provided on a sticker on the extender itself. Common default IP addresses include "192.168.0.1" or "192.168.1.1". Press Enter.
  5. You will be directed to the login page of the Wavlink extender's configuration interface.
  6. On the login page, you will be prompted to enter a username and password. The default login credentials can usually be found in the user manual or on a sticker on the extender. Some common default usernames and passwords are "admin" for both the username and password or "admin" for the username and no password.
  7. After entering the username and password, click on the "Login" or "Submit" button to proceed.
  8. If the login credentials are correct, you will gain access to the configuration interface of your wifi.wavlink.com where you can manage and modify the settings according to your requirements.


Isn’t it super-easy to follow? Try it now!!

What are the Features of Wavlink Wi-Fi Extenders?

Wavlink Wi-Fi Extenders come up with exciting features for users including the following:-

Dual-Band Support

Many Wavlink extenders support dual-band frequencies (2.4GHz and 5GHz), allowing for better compatibility with a wide range of devices and reducing interference.

High Data Transfer Speeds

Wavlink extenders often support fast data transfer speeds, such as 300Mbps, 750Mbps, or higher, depending on the specific model. This ensures a smooth and reliable connection for your devices.

Easy Setup

These extenders are designed to be user-friendly and offer simple setup procedures. They often come with a web-based interface or mobile app that guides you through the installation process.

Multiple Modes

They usually offer different operation modes, such as Repeater Mode, Access Point Mode, or Router Mode. These modes provide flexibility in how you extend and configure your network based on your specific requirements.

How to Reset Wavlink Extender Password?

  1. Locate the Reset Button

Find the reset button on your Wavlink extender. It is typically a small hole labelled "Reset" on the device.

  1. Prepare a Tool

Get a paperclip, pin, or similar pointed object that can fit into the reset button hole.

  1. Power Off the Extender

Ensure that the extender is powered on and connected to a power source.

  1. Perform the Reset

Insert the paperclip or pin into the reset button hole and press and hold the button for about 10-15 seconds. You may need to use some force to reach the button.

  1. Release the Reset Button

After holding the reset button for the designated time, release it.

  1. Wait for the Reset

Allow the extender to reboot and reset to its default settings. This process may take a few minutes.

  1. Connect to the Default Network

Once the extender has finished resetting, look for the default Wi-Fi network (SSID) that is usually mentioned in the user manual or on a sticker on the extender. Connect to this network using a computer or mobile device.

  1. Access the Configuration Interface

Open a web browser on the connected device and enter the default IP address for the Wavlink extender into the address bar. The default IP address is typically "192.168.0.1" or "192.168.1.1". Press Enter.

  1. Log In to the Extender

You will be directed to the login page of the Wavlink extender's configuration interface. Use the default login credentials (usually mentioned in the user manual or on a sticker) to log in. Once logged in, you can modify the password to a new one of your choice.

  1. Save the New Password

After entering the new password, save the settings, and wait for the extender to apply the changes. This process may take a few moments.

  1. Reconnect Devices

Once the changes are applied, reconnect your devices to the Wi-Fi network transmitted by the Wavlink extender, using the new password you set.

why wavlink extender is not working?
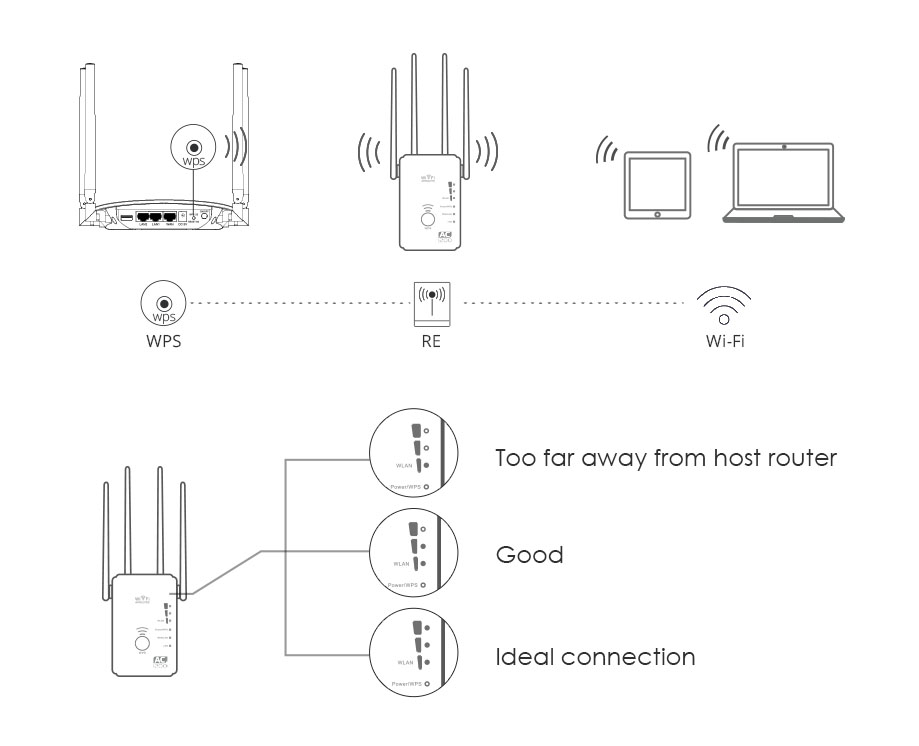
Improper placement

Improper placement can cause troubleshooting. Ensure that the extender is positioned within the range of your existing Wi-Fi network. Try to place it in a location where it can receive a strong signal from the main router and effectively extend the coverage.

Incorrect configuration

Verify that you have correctly setup the extender by following the manufacturer's instructions. Ensure that you have connected the extender to the correct Wi-Fi network and that the network settings are configured accurately. It's worth checking if the extender's firmware is up to date as well.

wavlink extender setup and login

Incompatible router or settings

Some Wi-Fi extenders may not be fully compatible with certain routers or specific network settings. Check the compatibility of your extender with your router and ensure that they are compatible. You can also try adjusting the Wi-Fi settings on your router, such as the channel or security type, to see if it resolves the issue. This is one of the main reasons of troubleshooting.

Power or connectivity problems

Make sure that the extender is receiving power and that all cables are securely connected. Ensure that the extender's LED lights are displaying the expected indications for power and connectivity.

Overlapping Wi-Fi networks

If there are multiple Wi-Fi networks in your area using the same channel, it can cause interference and impact the performance of your extender. Use a Wi-Fi analyzer tool to identify the least congested channel and adjust your router's settings accordingly.

Reset or reconfigure

If all else fails, you can try resetting the extender to its factory default settings and then reconfigure it from scratch. This can help eliminate any misconfigurations or software glitches that may be causing the troubleshooting.

Now, if all the above considerations don’t work then take the help of technician or contact the manufacturer.